SCOTCAT.COM
your internet guide to all things catfish
| THE FISHHOUSE | ||||||||||||||||||||||||||||||||||||||
by Allan James |
||||||||||||||||||||||||||||||||||||||
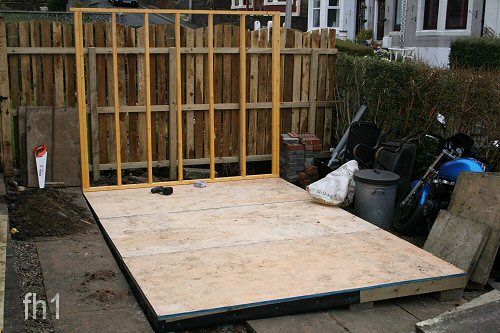
I decided that since I was not getting any younger, I would need to make this fishhouse, which would be my last, to be as user friendly as I could make it, and a sink with a work area was high on my list and a supply tank with a ball valve to return water after water changes was on the cards as well. I decided to make it a 12ft x 8ft so that 3 @ 8’ x 4’ x ¾” plywood sheets would be the base for the unit. Being a Joiner by trade I went for the wooden floor instead of a concrete layer as I was thinking of tiling the finished floor, but this was my preferred option and a concrete floor is also a good way to go if you decide to build your own. I started the project at the beginning of March 2007 so as to give me a good run through the summer as it would be mostly the weekends, if I wasn’t working, that I would be building it.
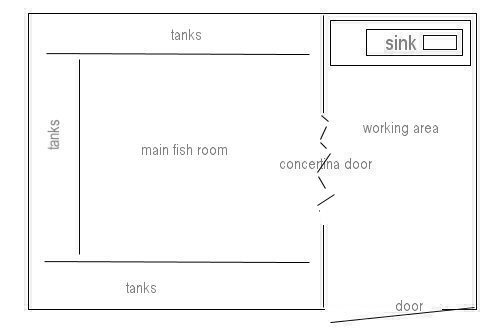
The ground base had slabs on it all ready so I started with 4”x 2” treated joists levelled with bricks and breeze blocks with the three 8’ x 4’ x ¾” plywood sheets screwed to the framework. The ground runs on a slope and I quickly discovered that by levelling the base, that one end would be around 12ins up, and it would end up being unstable and dangerous. I then decided that I would need to take away some slabs at the low end and dig down so that I could get the other end down to a manageable height. I also discovered that the height of the fishhouse would also have been a problem as it would have been well above my fence, which I had built the previous year and to the detriment of my neighbours. This proved a bit of a pain but it had to be done and in hindsight was certainly the best option The plan outlined shows the main fish room with a dividing wall from the working area. This can be closed of with the use of a plastic concertina (folding) door which opens and closes on a top runner.
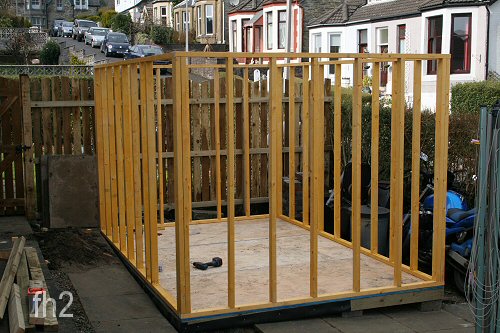
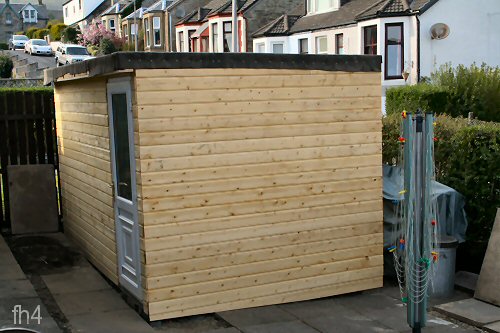
The image fh2 shows the construction with the framing partly completed apart from the bracing pieces in the corners which I will show later. The height of the structure from the floor up is 79½ins (2020mm) and is screwed down onto the floor. I would like to mention here that I decided on a flat roof structure over a pitched roof as it would not be so noticeable over the height of the existing fence, but this is only a preferred option and there are arguments on both sides for the two different types of construction if you are keen to go ahead with your own project. I then fixed 5” x 2” joists for the roof, nailed to the top runners of the framework. These had been run cut from 5ins to 4ins on the length to give me a 1 inch fall towards the hedge/road side of the construction (your local builders yard can do this for you) and away from the door side which as you can see in image fh3 will be opening out towards the gable end of my house.
As you can see in image fh3, the ¾” sheathing ply has been screwed to the roof joists. You can also see that I have overlapped the door side of the roof over the framework to give the door more protection from the elements and filled in between the joists front and back to give a surface for the facings which would be applied later. I have also braced each corner to give the structure more stability. The next stage is to apply the first layer of felt with adhesive and fix the weatherboard to the framework (fs4) and this is when you can see that you are finely making progress and making the structure watertight in the process. You can also notice that I now have a U.P.V.C. double glazed door fitted. You may think that this is an extravagance but it was my old kitchen door which I had kept a year previous after fitting a new one, and it would be maintenance free and draught proof, which was an added bonus.
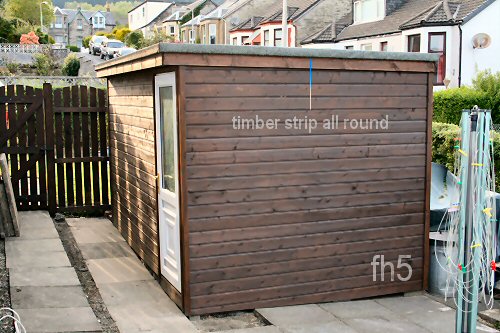
The next stage was to lay the second and final layer of felt which would be green mineral and applied with adhesive also. A good practice on flat roofs is to extend out ¾” so that any relevant drips from any part of the roof will not run down and stain the weatherboard. I have pointed this out in image fh5. I have also finished the corners of the structure with facings and coated it with two coats of a timber waterproof stain.
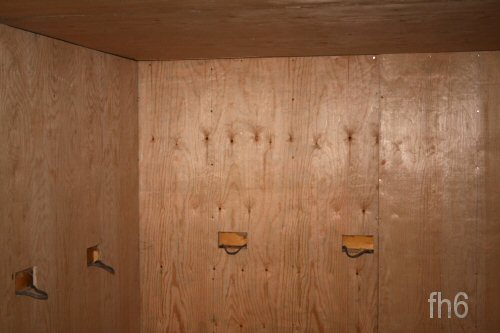
You will also notice the missing slab as this was my entry point for the electric cable which I dug underground and into the fishhouse and up the interior wall to be connected to a fuse box. The electric cable had been put in place from the house by my next door neighbour who is a qualified electrician and I would advise to go down this route, as electrics and water don’t mix very well!! This was me now into the end of April and it was now beginning to look like a fishhouse. I now started on the inside, fitting insulation wool in the framework and screwing ½” sheathing ply to ceiling and walls (fh6). I then proceeded to mark out and cut the holes for fitting the double sockets. I ran a wire ring main around the walls having of course to drill holes in each stud to bring the cable through. I had decided on plywood for the walls although I had fitted plasterboard in my old fishhouse, and apart from a blackening at floor level was actually not too bad, but with plywood you can screw anywhere you want to without having to locate a stud. It was of course much more expensive and later on I had serious doubts of my wisdom, which I will explain later.
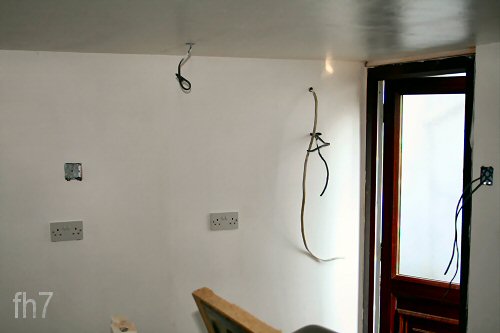
The next stage was to fit all the sockets, which was later checked by my electrician friend, and as you can see in image fh7 the walls and ceiling were given 2 coats of a white bathroom quality emulsion which was to combat any fungal attacks. You can also see the cables for the middle fluorescent light in the work area and the cables near the door for the main fuse box. The open switch box above the double socket is for an immersion heater which was given to me “free gratis” by my plumber friend who was to prove a godsend in the later stages when the sink and storage tank was to be fitted. His work and the electricians was what we call in the trade as the “barter system” and he had a bit of work needed on the exterior of his house, so no problem there. This is where the plywood problem arose as I had been getting problems with my eyes when I was working inside, and my wife or anybody else could not enter the Fishhouse because of the stinging sensation, in their eyes and the back of their throats after a few minutes. This was a puzzle to me which I thought I had cured when I had painted the walls and ceiling but this did not make any difference and for once I was really deflated and downhearted as I wanted to get on, but I could not progress any further until this problem was rectified.
I asked at the local timber yard but they could not provide an answer until I heard from another Joiner that they were now treating sheathing ply with different chemicals and I now concurred that this was the problem that I was facing as these sheets are used for house building, but they are on the outside walls of buildings before the bricks/blocks are built and as such would never reach inside the house, as there is framework, insulation and plasterboard on the inside of the plywood sheets. Before this revelation I had cut through the walls to install 2 vents and also an electric fan to take the air out and fresh air in. This did not make any difference and it was a chance encounter with a painter that I was told that with the emulsion covering I would never get rid of this odour and I would need to paint it again using an oil based paint. I was not totally convinced of this and I was even thinking of taking the entire ply off and reverting back to plasterboard again, which was a massive task now and I was just getting very depressed with it all. The upshot of it was that I purchased a 5litre tin of a cream undercoat (so I could see where I was painting) and dutifully applied a coat on the walls and ceiling, he did say that it would be a couple of days before the smell of the paint would subside but I couldn’t believe it as a few days later this stinging sensation to the eyes was completely gone, and the undercoat had sealed whatever was causing it, in. I applied another coat and although I was painting again over the areas that were painted a few weeks ago I was so much more upbeat that at last I had eradicated the problem. This is a lesson well learned and if you do decide yourself to plywood your walls with the cheaper sheathing ply, apply either undercoat or gloss if you come across the same problem as me, as you will not be able to last 5 minutes in an enclosed area with it untreated. I now concentrated on the floor and I picked up floor tiles which were on sale at one of the DIY superstores for a bargain price, which you can see in the final material count, and laid them before I got around to erecting the dividing wall to split the fishhouse up in to two areas. This would of course limit the amount of tanks that I would have but I hold great credence in that I can have an organised fishhouse where I can also relax ( note the radio!), as I would be spending a bit of time hopefully in there and the fish would be getting the best of my attention.
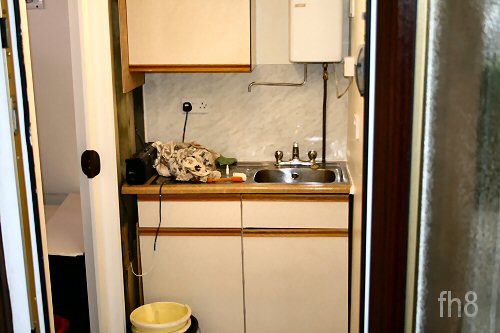
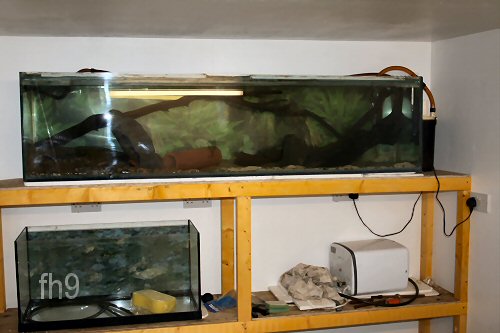
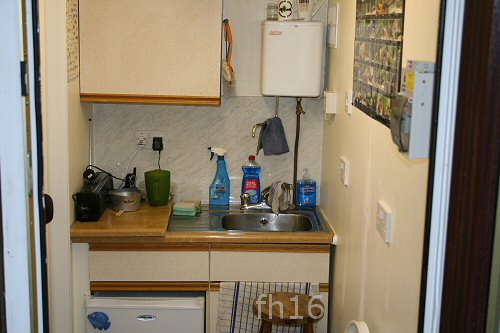
After the electrics were all fitted and working I dug a trench from my existing outside tap around to the rear of the structure and laid a length of polyethylene blue pipe which is quite pliable and able to manouvre around corners. One end was connected to the pipe work leading to my outside tap, and the other end was fed through the wall using connectors to join up to the copper pipe work which fed the sink and through to the 60gall cold water plastic supply tank on the other side of the dividing partition wall. This was all carried out by the plumber over two weekends. The sink, unit and wall cupboard were all sourced from a new kitchen fitting job that I had carried out about 6 months previously (fh8) and they were the old units from this job. They were to be thrown out anyway and the bonus was that they were in quite good condition. You may also notice the water heater, which I had not thought much about , but was pleased to be given it as later I was to find out that it would be an integral part of the work area, with hot water on tap so to speak, as the main source from the tap was of course only from the cold supply. In this image you can also just see the pull handle on the dividing folding concertina door. Previously to installing the pipe work I had started to set up my main show tank which would be situated at the far end wall furthest away from the dividing folding door (fh9). This was a 6ft tank which I used to have in my living room for the best part of 15 years until my wife decided that she was getting the room decorated from top to bottom, and it had to go. It lay around the back of my house for two years knowing that when the chance came to build the new fishhouse I could set it up again in there. Surprisingly after a good cleaning it did not leak, and when it was up and running I was beginning to see the light at the end of the tunnel, so to speak!.
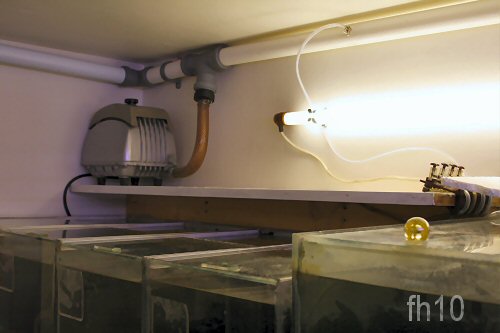
After this I started on the rest of the framework which would house the tanks from my old fishhouse and would be 3 tiers high. The bottom would be for storage, or the odd coldwater fish tank, and the upper two tiers for the rest of the tanks which would comprise of around 20. 1 @ 6ft., 3 @ 4ft, 3 @ 3ft and the rest would be miscellaneous sized tanks for breeding purposes. At this stage I also fitted the pipe system which would supply air to a lot of the smaller tanks with foam and bubble up filters (fh10).
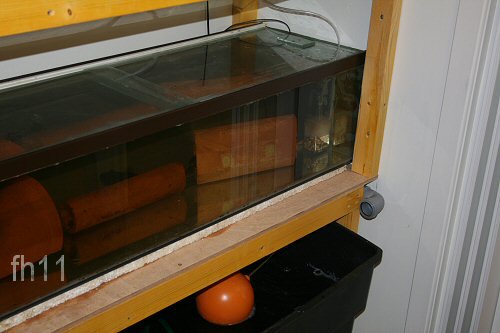
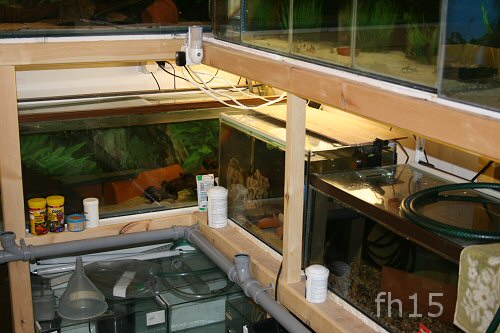
In the image fh11 you can see the cold water supply tank which would feed the tanks after water changes with a hose attached to a submerged pump. The supply tank was to be one of the more expensive single items that I had bought. The return ball valve was a great addition as this stopped the carrying of buckets to fill the tank up, as it just filled up automatically when the level of the water in it, dropped. I had thought of the chlorine situation in the water supply but I have had no problems on this score, as the water is pumped up from the bottom layer, as the water comes in from the top, and also the chlorine will dissipate after lying in the tank after 24 hours. There is of course an overflow pipe fitted from the tank which goes through the wall to the outside in case of the failure of the ball valve, which would lead to the tank overflowing.
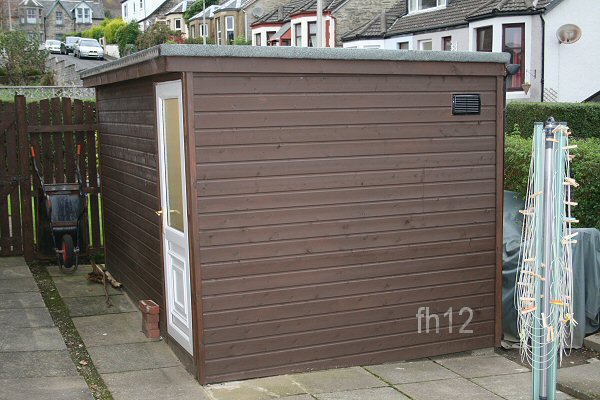
At the right of image fh11 you can see a pipe bend which is to be connected to a length of 1½” pipe which will go around the bottom frames and will act as the takeaway from my water changes. There will be a few open upstands to take the water away. This again saves the use of buckets to and fro to the sink. The waste goes out to a pipe that was also laid underground and takes it to a drain which was already situated there under my driveway. I can of course use buckets when siphoning out of tanks with fry in them. The final picture (fh12) shows the completed fishhouse with the addition of a vent which matches the vent on the other gable end. There is also an electric fan fitted in the fish room if it gets too hot in the summer !!.
I concreted and cemented around the base of the structure so that any water will run away without going under the fishhouse. There will probably be some water which will go underneath but hopefully not too much. I have given below a rough breakdown of the costs of this 12’ x 8’ structure, if you are thinking about constructing your own Fishhouse. These prices (circa 2007, Scotland) will give you an idea. Depending where you live you may be able to get these materials at a more favourable price, but as I live in a rural area the costing of many products leads to a higher cost of living compared to any fair sized City. This of course does not include labour and if you are anyway skilled you would be doing the majority of the work yourself anyway.
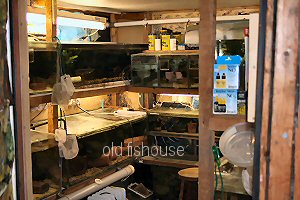
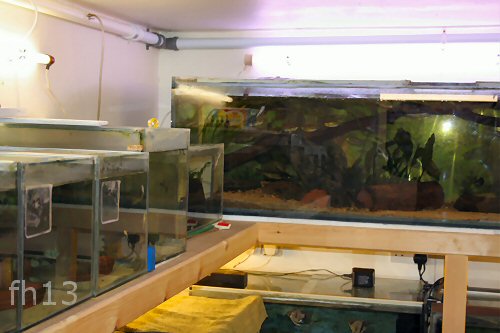
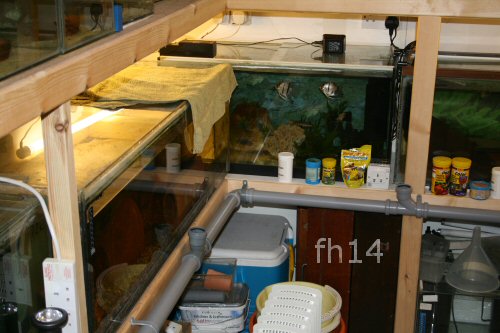
The fish room ended up just under a 8’ x 8’ area and the work area about 3’ 6” x 8’ 0”. The wall on the left hand side as you enter the fishhouse, I intend to build a rack which will hold about 4 @ 24” x 12” x 8” tanks or equivalent. These can be used for cooler water species such as S.barbatus, prionotus, paleatus etc. This is in the work area and is not heated so I will maybe be able to keep these tanks at around the mid sixties Fahrenheit. The main fish room is heated at night by a water cooled storage heater with a thermostat and the room is lit after lights out by a “dusk to dawn” bulb, so as not to startle the fish when the lights come on automatically in the morning. There is room in the future to add to the existing tanks by a further shelf to the top layer, which would give me an extra 14 tanks at 18” x 12” x 12”, for future breeding projects. Below are a few images of the finished interior.
Summary: All in all I am quite pleased with the finished outcome, especially with the sink area, which I would say was invaluable and the immersion heater, plus the addition of a small freezer for my frozen food. The supply tank also saves a great amount of time with the water automatically returning via the ball valve during water changes. I have added a stop cock outside which I would advise if you are having problems with chlorine or other water matters, as you can turn the fishhouse off, carry out your water changes, and then turn it back on again to let the supply tank fill up again. The only problem that I seem to be having is condensation running of the plastic supply tank and on to the tiled floor. I did cover it with polystyrene and plywood but I am still having the odd wet floor due to this trait. This is due of course to the colder water drawn into the tank and I should not have this problem in the summer months. My old fishhouse had a purpose built wooden box for water with a liner and I may revert back to this method in the future if it continues to present a problem. This may give you an incentive to carry out your own Fishhouse project, taking some ideas from this build. Good luck!. allan@scotcat.com |
||||||||||||||||||||||||||||||||||||||


If you would like to contribute an article, please e-mail me. You will of course be credited for your work.
If you would like to donate any denomination of money to the site just click the above link button. All proceeds will go to running the site and hopefully to keep it going for a few years yet.
Print or e-mail this factsheet below
